22 Avoid Floating Objects on the Drawing Layer
Heather Caprette
In Word, there is a Document Layer and a Drawing Layer to a document. Objects such as Text Boxes, Shapes, Smart Art, Charts, Word Art, and Miscellaneous inserted Objects float in the Drawing Layer. These floating objects may not be detected and read in the correct order when a screen reader reads the text on the document. Though, modern versions of Word, JAWS and NVDA are getting better. Both JAWS 17 and NVDA will announce that there are embedded objects on a Word document. Word 16 has a way to add alternative text to these objects, which is explained below. JAWS will bring up a list of floating objects when the user presses Control + Shift + O on her keyboard, but these objects may not make sense when taken out of the flow of the document. NVDA doesn’t read objects in the drawing layer.
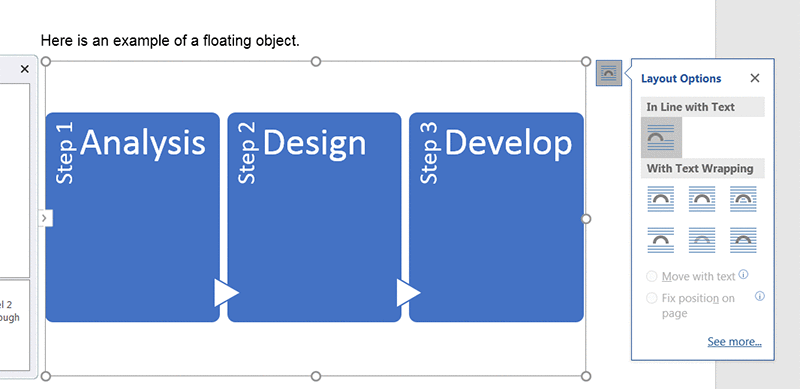
If you set the objects to be In Line with Text, this can often move them from the Drawing Layer to the Document Layer and make them accessible. This can be done by selecting the object by clicking on it. Click on the Layout Options icon to the top right of the selection. It has horizontal lines and an arch, and select In Line with Text.
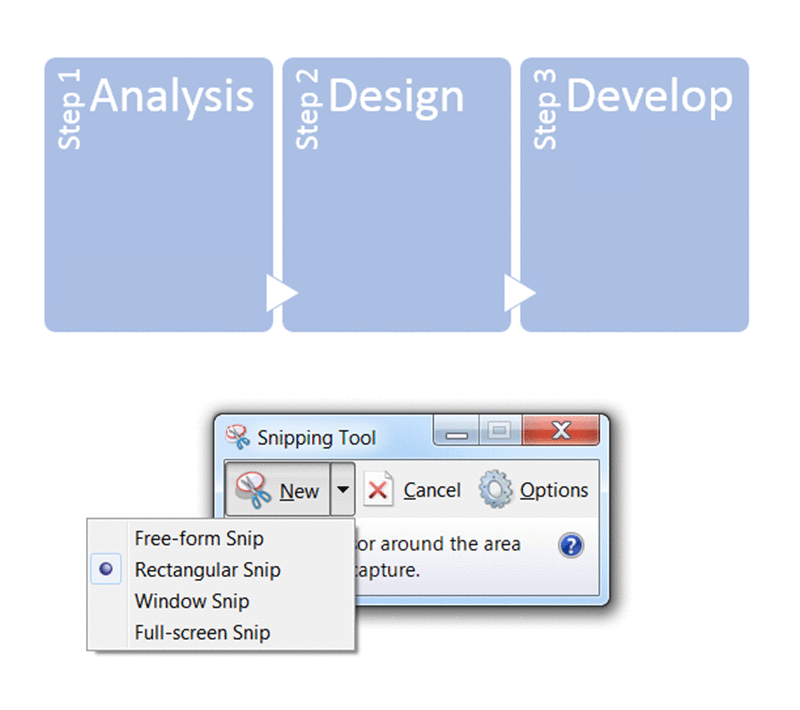
Diagrams and illustrations created with Shapes and Smart Art can be copied to the clip board and then reinserted as one image within the document. You can save a copy of the document with the separate Smart Art and Shapes in case you would need to go back and edit. In another copy of the document, you would delete all the separate shapes that make up your diagram, and insert the single image you’ve snipped. You can then add alternative text in the Image Description field for this one image, to make it accessible. In Windows, you can copy the image to the clipboard with the Snipping Tool. To bring up the Snipping Tool, enter “Snipping Tool” in Windows Search box. The Search box which contains the default text, “Search for programs and files,” is found by clicking Window’s Start icon in the lower left of the screen. The Snipping Tool program will appear at the top of the search results. Click it to open it. The background will white out somewhat, and the Snipping Tool will be a floating window. Under the New menu, select Rectangular Snip, and then drag a rectangle around the area of the screen you want to capture as one image.
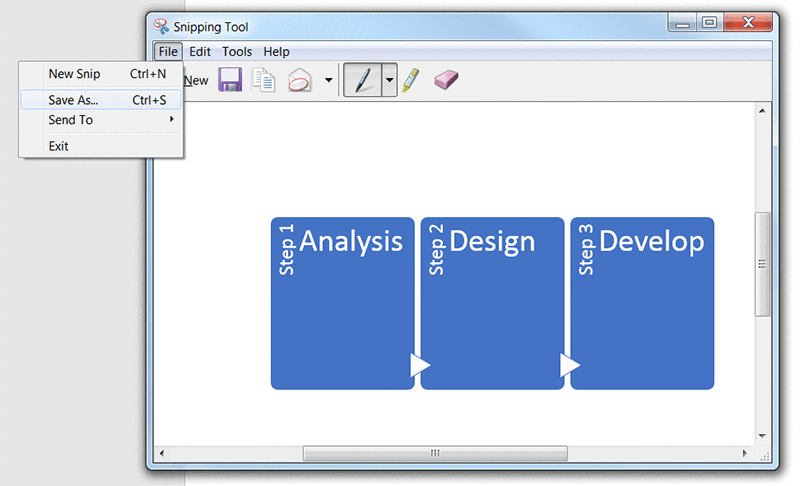
Once the image has been copied, you can go under the File menu and select Save As to save it as a .gif, .jpg, .png, or .mht. If the image contains large areas of solid colors, GIF is a good format to choose. If the image is a photograph or has subtle gradients, choose either JPG or PNG. MHT is a proprietary Windows format which I can’t recommend. Sometimes, learning management or content management servers don’t contain the MIME types to display the format.
After saving out your Word file as another document, go under the Insert tab and select Pictures from the ribbon. Browse to your newly created image, select it and click Insert. With the image selected, right click on the image and select Format Picture from the context menu that pops-up. From the Format Picture pane options, select the icon that looks like four arrows forming a white cross on a blue background. It is the Layout & Properties button. Expand the Alt Text option by clicking on it. This brings up the Description field into which you should type your alternative text. The image below shows the Layout & Properties button outlined in a thick red box and the Description field where you would enter your alternative text.

On a Mac laptop or desktop, you can use press Command-Shift-4 on the keyboard to bring up a tool similar to the Windows Snipping Tool that will let you take a screen shot of a window on your desktop. There’s an explanation of how to take screen shots on your mac at http://www.macworld.com/article/2987618/os-x/how-to-take-screenshots-on-your-mac.html.
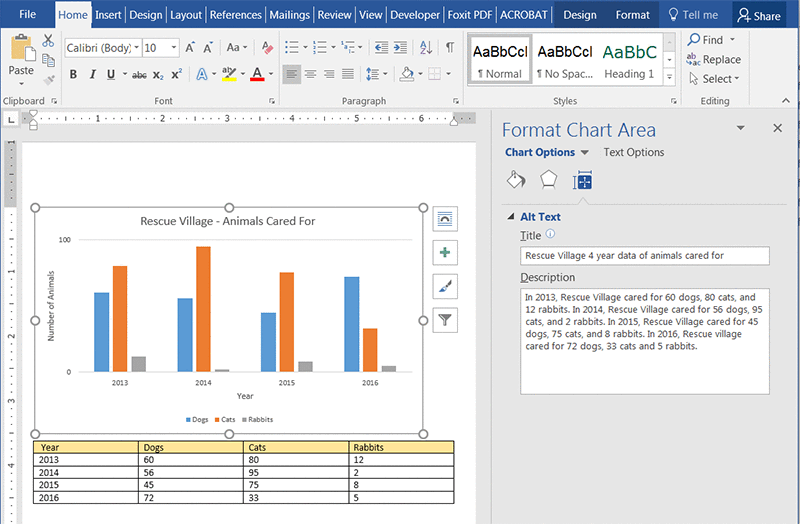
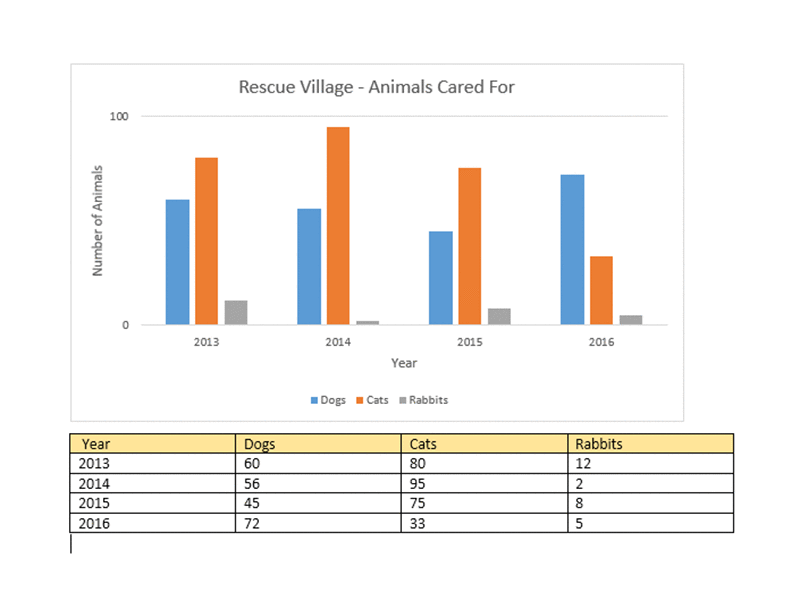
If you have an object that represents data, for example a bar chart, you can explain the equivalent of the information presented within the body of the document, or create a simple accessible data table, such as in the example below. NVDA will read the table column headers before each data cell. JAWS 17, in default settings read the column header row once and then simply read the following rows linearly.
In Word 2016, there is the ability to add alternative text that describes the data within the chart. JAWS 17 will recognize this alternative text and read it. You can add alternative text to a chart by selecting the whole thing (an outline will appear around the outer perimeter), right click and select Format Chart Area. When the Format Chart Area pane opens on the right side of the screen, click on the Layout & Properties icon (crossed white arrows on blue background), and type the equivalent of the information the chart presents within the Description text entry box. You can add a title that represents what the chart is about.