20 How to Create Accessible Tables in Word
Heather Caprette
Tips for Creating Accessible Tables in Word
- Tabular data should be represented in a table
- Do not use the Draw Table tool to create the table
- Give your data table a Title in the properties
- Designate your table headers correctly
- Data tables must have only one header row and/or one header column
- Tables must not contain nested tables, split cells or merged cells
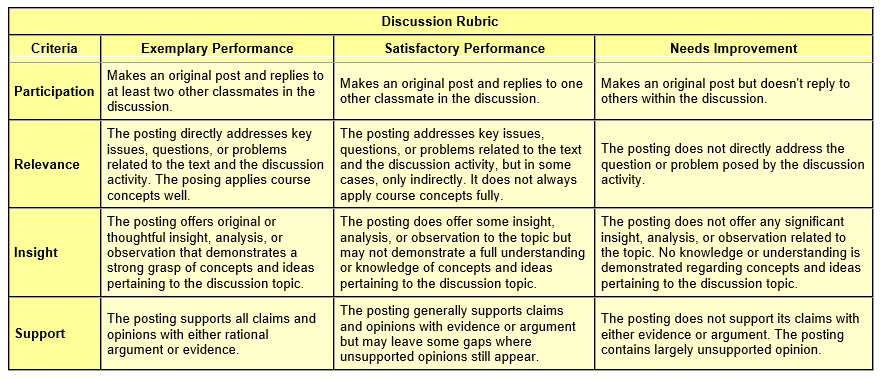
Tables can be used to layout information that has a two-way relationship, or tabular data. Information that has a two-way relationship is found in grading rubrics, evaluation information and course schedules.
Screen readers can be set to read the header table cells before a corresponding data cell to tell the user what the data is and give it meaning. The column headers are in the first row of the table, above the data columns. In the Discussion Rubric table, an example of the column header would be “Exemplary Performance.” It would be read before each data cell beneath it to associate it with the description in each cell below it for the criteria. A row header would be found in a column on the far left. An example of a row header would be “Participation.” It too would be read before the data cells in its row.
| Criteria | Exemplary Performance | Satisfactory Performance | Needs Improvement |
|---|---|---|---|
| Participation | Makes an original post and replies to at least two other classmates in the discussion. | Makes an original post and replies to one other classmate in the discussion. | Makes an original post but doesn’t reply to others within the discussion. |
| Relevance | The posting directly addresses key issues, questions, or problems related to the text and the discussion activity. The posing applies course concepts well. | The posting addresses key issues, questions, or problems related to the text and the discussion activity, but in some cases, only indirectly. It does not always apply course concepts fully. | The posting does not directly address the question or problem posed by the discussion activity. |
| Insight | The posting offers original or thoughtful insight, analysis, or observation that demonstrates a strong grasp of concepts and ideas pertaining to the discussion topic. | The posting does offer some insight, analysis, or observation to the topic but may not demonstrate a full understanding or knowledge of concepts and ideas pertaining to the discussion topic. | The posting does not offer any significant insight, analysis, or observation related to the topic. No knowledge or understanding is demonstrated regarding concepts and ideas pertaining to the discussion topic. |
| Support | The posting supports all claims and opinions with either rational argument or evidence. | The posting generally supports claims and opinions with evidence or argument, but may leave some gaps where unsupported opinions still appear. | The posting does not support its claims with either evidence or argument. The posting contains largely unsupported opinion. |
Inserting a Table
To insert a table:
- Click on the Insert ribbon
- Click on Table
- From the menu that opens, select Insert Table
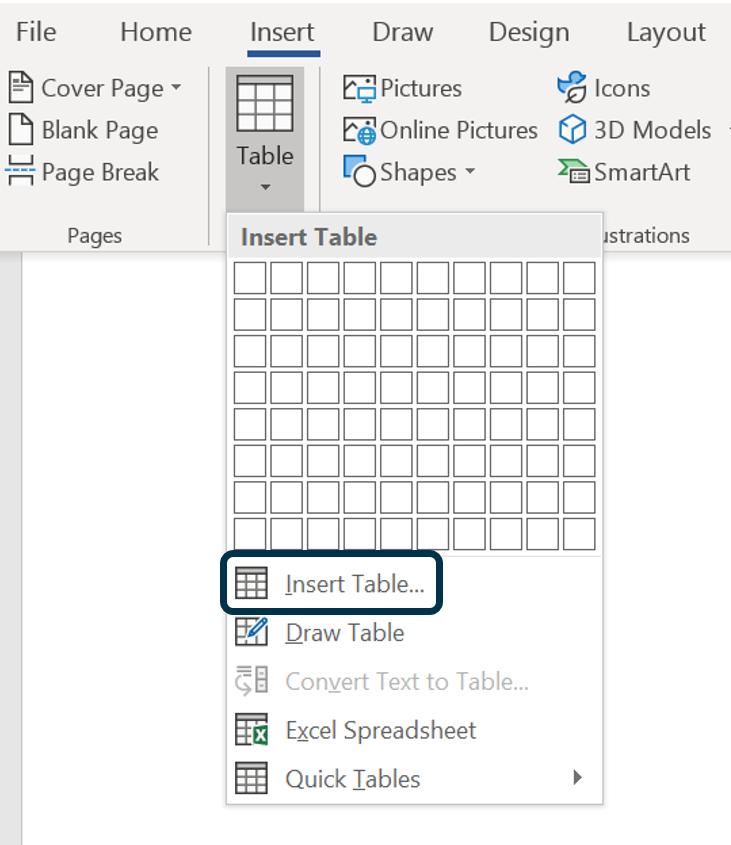
- In the next window that pops up, enter the number of columns and rows you will need for your table, then click OK. An example of this for the Discussion Rubric table is shown below.

Adding a Title to Your Table
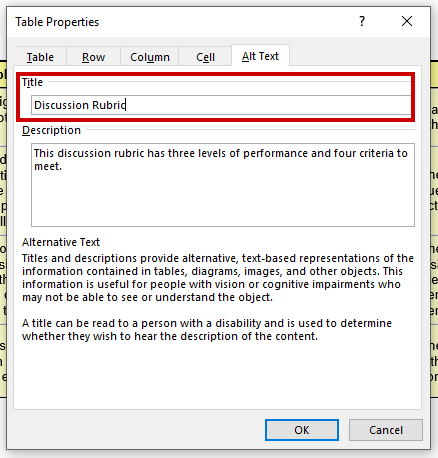
A table Title when read by a screen reader, expresses what the table is about. Unfortunately, it isn’t seen by a person with sight, so you will want to add a heading above the table, or some text to express the same title, e.g. Discussion Rubric. The alt text for a table in Word is not always read by default, by a screen reader.
To add a Title to your table,
- Right click on your table and select Table Properties. The image below demonstrates this step.
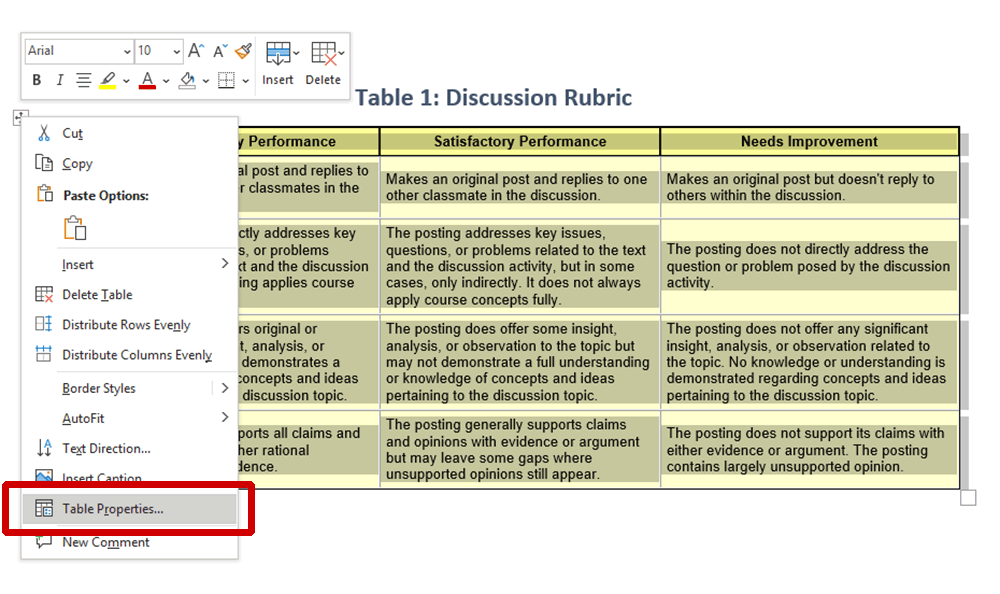
- Click on the Alt Text tab
- Enter a meaningful title in the Title field. Then, click OK. This is demonstrated in the image below.
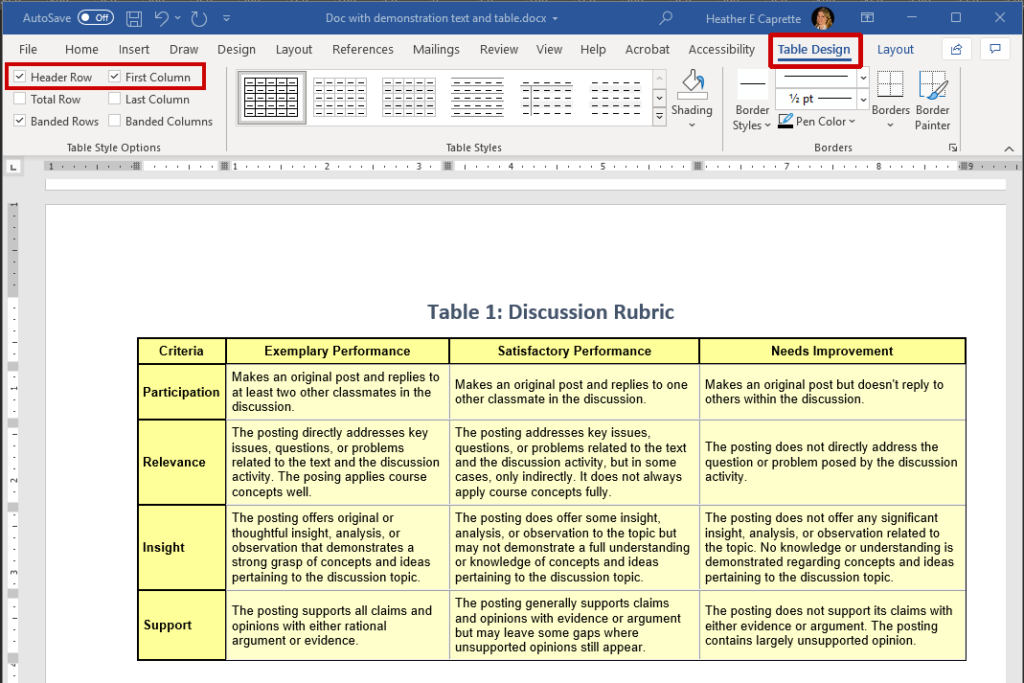
In Microsoft Office 365 Word, when you create a table, the box for “Header Row” and “First Column” are automatically selected and these help to designate column headers and row headers respectively. If you do not need row headers (far left column), you an uncheck “First Column.” In the case of our Discussion Rubric, we do need both. See the image below that demonstrates this under the Table Design ribbon.
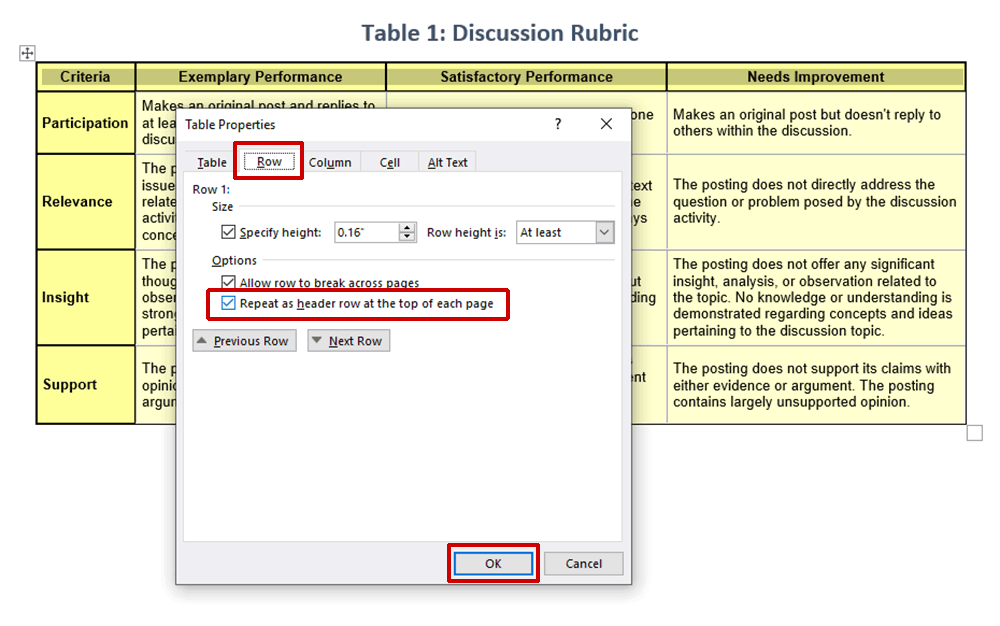
Setting the top row to Repeat as Header Row at the top of each page
* Even if you have the Header Row box checked off for your table on the Table Design ribbon, you should do this step also to designate your top row as your column headers for screen readers and in case your Word document is converted to another format, such as HTML or PDF. Tables with header rows that repeat across pages, in long tables, also help sighted users.
- Right click on your table and go to Table Properties
- Select the Row tab
- Check off the box to the left of “Repeat as header row at the top of each page“
- Click OK
The image below demonstrates this step.
Do Not Merge or Split Cells, or Nest Tables
It’s important to have one row and/or one column for header rows and header columns in Word. It doesn’t have a method to designate multiple rows of headings as in HTML. You might create two rows of headers that look just fine to people who are sighted, but this will not read back correctly using a screen reader, especially with split or merged cells. The image below is an example of this bad heading setup in a Discussion Rubric table. Note that the top row has merged cells and creates an extra row of heading. Screen readers read linearly, from left to right and top to bottom, row by row. It helps to keep this in mind when setting up a Word table.
Listen to the movie tutorial on how to format a simple table, with closed captioning (opens in new tab)
Below is an example of combining information that should be spread across more than one table. It’s one table. If you merge and/or color cells to create a visual separation from different content, JAWS may not read the information in an order that makes sense to a screen reader user. The following example is from a real table setup I’ve seen in a course. It’s one table that combines what should have been an “Evaluation Methods” table and a separate “Grading Scale” table.
Listen to JAWS reading tables which never should have been merged.
Instructions for Mac
To set a header row that repeats at the top row of a table in Mac, see the topic Data Tables on the NCDAE page on Creating Accessible Wrod 2016 Documents (Mac) at http://ncdae.org/resources/cheatsheets/word2016-mac.php.
You can select “Repeat Header Rows” from the Table Layout tab of the ribbon.
